20 January 2011

The Visitor

Some of you probably know that I work from home. I have a desk facing out one of my front windows. It's a decent view, but decent really just means I'm not staring at a wall when I take my eyes off the computer screen. Anyhow, I come to the tail end of my morning telecommute and start becoming eager to start lunch because today turned out to a pleasant sunny day, perfect for busting my pad's barbecue cherry.


I moved into this place last October and for some reason I haven't bbq'd here yet. But today was the day to grill what I'd been preparing for nearly three days. Ribs...


I brined them in the base brine mixture from Charcuterie. I believe I've linked to this book before, but really, if you're interested in curing your own meats and stuffing your own sausage, this is probably thee best place to start.

To the base of:

1 l water
1/3 c salt
1/4 c sugar
2 tbs pink salt,

I added the following:

5 juniper berries
1 tsp black pepper corns
2 laurel leaves
1/2 chopped small onion
4 clv garlic
1 tsp mustard seed
1 tsp chili powder

I got the idea to cure the ribs from my friend JC who lives in LA. He had tried to actually corn his beef ribs, but he had overbrined the ribs thus making salty ribs. My idea was to cure pork ribs to make them taste like bacon. I had previously tried this with the typical bacon curing elements and although tasting good, did not taste like bacon rather more like ham. Due to the failed bacon rib, I'd abandoned that plan and went toward trying to push the ribs to taste like a country ham complete with mustard glaze.

I began by cutting a slab of pork spare ribs into equally portioned segments to reduce a 12 hr brine to a 6 hr brine. After the customary rinse and additional rest day for more equal salt/seasoning distribution throughout the meat, I slow braised them in a mustard-base bbq sauce (see below) wrapped in foil for 6 hrs. I believe it was 6 hrs because I remember starting them late afternoon and pulling them out around 10 o'clock before I went to bed. What I know for certain was that I kept myself awake because I didn't want to set an alarm to wake me up to take out some Goddamned ribs and then go back to bed. That'd just be crazy.

What's crazy is that I got crazy pants in the pantry for the mustard sauce:

1/4 c yellow mustard
1/4 c molasses
1 tsp dried chopped garlic
1 tsp dried chopped onion
1 tsp black pepper
1 tsp dried rosemary

I took the ribs out, wrapped them in foil, and poured the braising liquid into a saucepan to later reduce with more mustard and molasses for basting.

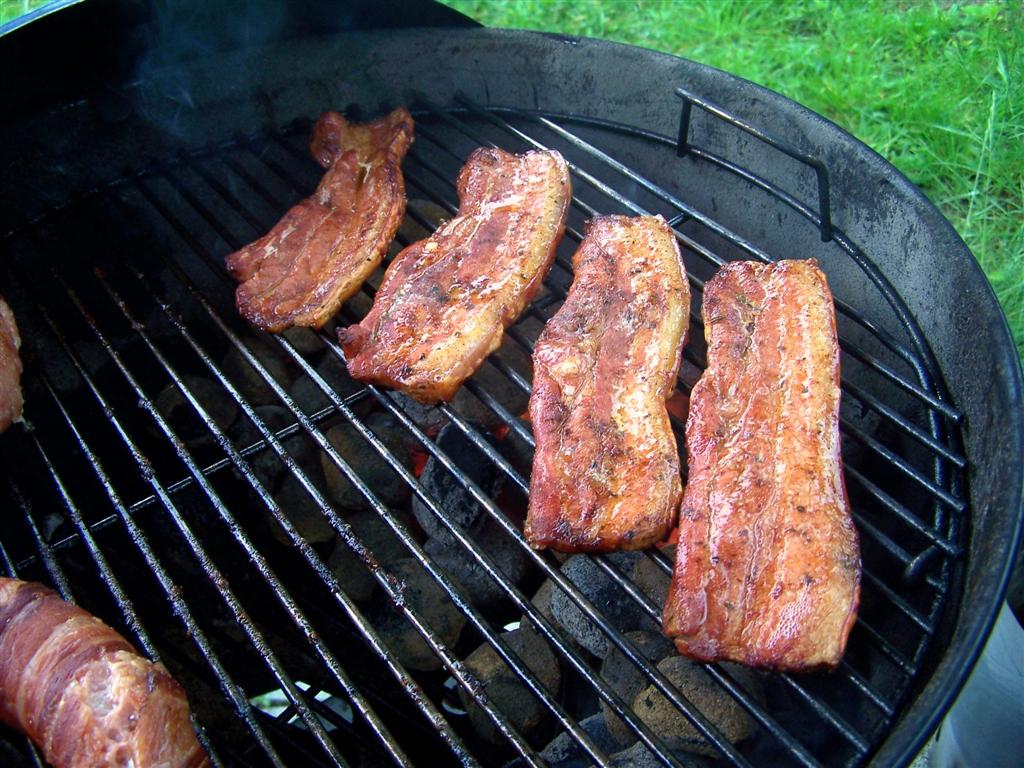
All I basically did this afternoon was start the grill, throw the ribs on, baste the hell out of them while the fire did it's magic.


Unfortunately, I cannot describe how these ribs tasted because I brought the ribs in from off the grill to rest, I went back out to gather the rest of my grill crud and when I got back in, this jerk was there and had started in on my ribs:


I was like dude, wtf?!

He just stood there with that gentle arrogant face smirking back at me, so I knocked the rib out of his hands and what did he do? He started barfing up all these collard greens.


It looked like they were made from about 6 oz of homemade bacon, 2 bunches of greens, two self-pickled Fresno peppers, some garlic, black and white pepper, an onion, and I think I smelled molasses and vegetable broth.

At that point, I was just shocked and disgusted. I was so distracted and riddled with disbelief at the temerity of this guy that he was able to make off with the rest of the ribs.


I'm glad I had the presence of mind to stop him from snaking my Easy Cheese.

12 January 2011

Vaya con tostada pizza por ahora

In keeping with my New Year resolution to post at least once a week, I am either going to post recent cookery or post the back-log of items I have recorded in my long blogging absence. So far, so cooked.


I have been eating out entirely too much lately. Mostly out of laziness and convenience, but I realized that, although I'd been buying some decent food, I've been purchasing some pretty mediocre fare as well.

I'd been left with a large surplus of pickles, leftovers, and pantry stock that has been untouched for some weeks. I blame the holidays for the neglect, as I've perpetually been given food--and the cheap bastard I am--I am always reticent to turn it away.

I have finally worked my way through the gratis food and became determined to use my current cache and cease paying for drab local stomach-filler when I could at least be making it myself.

On these excursions, I'd usually be picking something up from a market for later preparation. The most prominent among ingredients coming from mercados that I frequent.

I didn't make anything genius today, but it was surprising that it worked and better that it fed two dudes with lasting satiation. And with that, I give you the tostada pizza:


I was particularly weary with this concoction because I had no hand in the creation of a few toppings that I would normally make for myself: those being the crust, the refried beans, and salsa.

The crust was a package of add-water-to pizza mix (gifted), the refried beans out of the can, and the salsa being leftover from Lalo's that I am still in the process of reverse engineering for personal recreation.

Lalo's sala has a tomatillio, heat provided by serrano peppers, finely diced onions, lime juice, some garlic, and some cinnamon. This is all I can tell so far. You can buy a 16 oz soda cup for 4 bones to take with, or 8 for a 32 oz cup.

At least they were these beans


The assemblage of this pizza starts with a prepared package of pizza dough laid out and dotted for bubble prevention. Upon this is smeared a heated can of beano refrito and then topped with the Lalo's salsa. Tostada shells are cracked, and pressed into the beans and then covered with quartered pieces of provolone. For toppings, I used sliced red onion, diced tomatoes, and sliced olives. I like the soft sweeten taste of cooked tomatoes and the cool feel of fresh tomatoes against a hot pie post bake, so I topped the pizza with half the tomatoes before baking, and threw the other half on before consuming.

Here is the end result after 600°F for 12 minutes in my electric oven.


As I do with all my pizzas that I remove from the oven, I crushed oregano flakes (Mexican in this case) over it for the pleasant fragrance and a twist of pepper and toss of sea salt.

I would've added crushed chili flakes, but Lalo's salsa is spicy and robust enough a flavor to deal with the unseasoned toppings.

The result: A Taco Bellish version of a tostada in the vein of the Double Decker Taco. Soft crust, beanie interval with a splash of salsa flair, followed by the chewy stretch of the provolone before the mix of cool tomato pressing down across my palate on top of firm black olives and follow-up crunchy bite of subdued baked red onion.

Tasted better than a Double Decker but took two hours of prep and cook time. Mind you I didn't miss any work, as my kitchen is 10 ft from my work station at home, duh!

06 January 2011

Pickle and a Pickle and a Pickle

Happy New Year, Kids!

I'm back after four months of extensive pickling experimentation...well not really, but I've been doing a lot of pickling

a lot of wine-making


and miscellaneous food preparation such as this deboning of a turkey in order to stuff and re-sew it back together


But the turkey is for another time as is the wine-making, for it takes a good 6 months for the sarsaparilla wine to mellow and mature.

In my absence though, I have accomplished one thing though, and that is the standard Skipper pickle. It is an at first pleasant garlic dill but is followed by a spicy follow-up that left alone, meaning ceased consumption, will build to a sensible but not awful heat in the back of your throat.

Since the summer, my pickles have maintained their heat due to an abundant late pepper harvest despite the cool weather. I grew the ubiquitous jalapeno to the scalding Thai pepper. People with a palate for spice haven't complained about my generous 5-15 l batches of pickled goods of cucumber, carrot, and broccoli that I've given away.

It wasn't until I began running short of peppers that I was forced to rethink and adjust my recipe to a new beast.

I have a few friends that have multi-seasonal-fruiting citrus trees, and it was with this that I decided to work with. That and I had just finished painting a house that had a ridiculous number of lemons coming to ripeness.

I love lemons. There are endless dishes and dressings that call for it. I love making the simple lemonade and using them for my perennial need for Nước mắm, but that was the extent of it. I am aware that there are several ways of preparing lemons; such as, making lemon confit, lemon preserves, and candying it even. I like sour, but not enough to commit myself to a sour snack that would go rotten in month.

Then it occurred to me, why not ferment them. I checked through some casual online research that lactobacillus fermenting with lemons is common in parts of Italy, so it was a-go--leading me to simply add some lemons to my standard cucumber pickle ferment with a reduction in peppers.

I have to say that the results are very pleasant.


The cucumber has the standard dill taste that I would expect but with an additional brightness gained from the lemon's absorbic acid. This sour trait expectantly carries over to the other veg elements that were in the brine. The surprising component in the mix are the lemon slices. They have lost all their intolerable tartness and have taken on notes of the Thai chilies and garlic as well as some sweetness from the carrot. The end result is more of a sour savory fruit, which can hold its own along with any olive or other cured fruit or veg rather than hide in the background inter alios in a prepared dish.

I prepared this ferment over two weeks as follows:

3 l (12.5 c) 5 % salt solution (150 g kosher salt + 3 l water) (10.5 tbs salt + 12.75 c water 3.5 tbs salt + 4.25 c water)
3 lbs pickling cucumbers
1 lb celery
1 lb carrots
2 sliced lemons
1.5 heads garlic skinned cloves
1 half handful Thai chilies
1 handful dill seeds
1 palmful mustard seeds
1 palmful coriander seeds
4 bay leaves
1 cinnamon stick

Check every two or three days, and skim off the "bloom" or scum on the surface. "Don't worry, everything submerged is fine and in anaerobic heaven."

2-3 weeks is the normal fermenting time in the winter due to the colder weather and the icy apartment that I keep. If you're doing it in warmer conditions, slice a cucumber after one week. If it's uniform in color, it's ready. If some parts are lighter than others, allow the fermenting to go another week.

When you're ready to package, place the vegetables in your jar and cover with the brine (after being boiled to stop the fermentation). Some fermentation folks say not to boil it because it kills the beneficial bacteria and the further development of flavor in the fridge. In my experience it continues anyways. These pickles will keep in the refrigerator indefinitely (supposedly) as long as they're covered in brine, but I've never allowed them to go that long. Mostly because I get sick of them and give them away because I'm already working on another batch. I need the space.


25 September 2010

What to Do With Bacon


I know. It's been a while. Not much of an excuse except for moving to a place two miles across town. I'm fairly settled now, and find myself with no reason to not make a new cooking post. Unfortunately, the fermented pickle post will have to wait until I get a new enclosure for my other laptop's hard drive, which has all of the pickle pics on it.

Instead you will have to read what another asshole does with bacon. I give myself a pass on this, as I made the bacon myself and now have a surplus of.

So what sounds good on a nice 95°F Sacramento day? Mac and cheese of course. The lack of a cheese eating roommate and the quart of milk set to expire in the icebox has left me little choice.

It's pretty much your basic recipe: boil pasta, make a flour rue, add milk and cheese, combine, pour into baking dish(es), top with bread crumbs and rendered lardons.

Contrary to bacon fool instinct, I opted not to make the rue with the rendered fat and stuck with butter. I did however fry the breadcrumbs in the fat. The decision came from noticing people were too scared to eat the Elvis bread (bacon, peanut butter banana bread) I once made in which I substituted bacon fat for the butter. It was good, but I agree with one person's opinion that it tasted like death.

If you follow the previously mentioned steps, you will have something that looks like this:


Additionally, I chose to dish them into three smaller pie pans and freeze two of them. I live alone, so there's no need for me to have a giant cassarole dish rotting in the fridge instead of the souring milk and molding cheese that I initially was trying to avoid.

So that's that. Apologies for the long delay for the two of you who actually read this. The following are the measurements for the ingredients.

1 lb. pasta (shells here) - boil

3 c. milk
2 sprigs thyme } - simmer
2 cloves garlic

3 tbs. flour
3 tbs. butter } - rue it
1 tbs. mustard

12 oz. cheese - add it to the rue

Season to taste with salt/pepper

3 slices bread crumbed - spread over mac and cheese

6 strips bacon sliced into smaller strips ~ 6 oz. lardon
1 yellow onion diced } - render and top over bread crumbs
2 cloves garlic minced

400°F ca. 30 minutes

08 September 2010

Picklin'

Hey folks,

I haven't forgotten about this blog. I have just moved, so I've had logistics on my mind instead of drying duck breast prosciutto in my frat fridge. Foreshadowing...

luv,
Skipper

11 August 2010

Bacon Cure Take II


It's been a good while since I last posted, and with good reason: with the slew of kitchen oriented purchases last month (namely, a fermenting crock and a copy of Charcuterie by Michael Ruhlman and Brian Polcyn), I have allowed my brain to devolve into its more base form of reptilian curing and fermenting maniac. Although I have produced some decent foodstuffs, I don't feel comfortable writing about something that I thought was just alright.

So as I resurface from the brine of sauerkraut, fermented pickles, and cured meats, I emerge from hickory smoke with two varieties of bacon. Yes, count 'em, because I have both--sweet and savory.

To momentarily step back in time, I titled this post "Take II" due to the fact that I had one prior attempt that could be characterized as a nigh failure. The end result was a cured slab of pork belly with which I could de-ice a sidewalk. Although you can save an oversalted cure by setting the meat back in plain water for an additional day or simmer pieces in hot water for a minute or two to leech out the excess salt, it seemed like cheating and almost wrong to boil bacon, so I chopped up the smokey salt pork and set it in the icebox for future use with beans, soups, stews, etc.

Moving forward to last Tuesday, I purchase two additional slabs of pork belly south side of Sacramento at $1.95/lb. after receiving my package of pink salt in the mail. I found it cheap from an ebay shop and had two pounds delivered. Pink salt goes by other names, but I'm going to continue referring to it as pink because it's more gay that way.

Pink salt is an essential ingredient in the curing process and is simply salt with normally 5% sodium nitrite, which imparts the cured flavor and reddish hue to corned beef, hotdogs, and bacon, just to name a few. Without this element, your wienies would be a dismal prison-style grey sausage. It is also necessary in the elimination of harmful bacteria in the meat during the curing process and staving off botulism development during hours of smoking or drying at reduced temperatures. Aside from the function of pink salt as a "cooking" tool, it should be noted that it is pink, not because it came from some Sherpa's exotic Himalayan salt stash, but because a manufacturer tinted it, so pinheads wouldn't go and eat it and thereafter kill themselves from sodium nitrite poisoning. I could go into further detail about how the meat is safe to eat after processing and cooking, but I won't. I'm eating it, not you, and you can look it up yourself.

Now that I've dropped some science on you, back to my 8 lbs. of pork belly. Step, the first, I combined my basic dry cure of salt, sugar, and pink salt for dredging in the following measurements:

1 lb/450 g kosher salt
8 oz/225 g sugar
2 oz/50 g pink salt (10 tsp.)

note: Charcuterie gives an alternative of 13 oz of dextrose in lieu of the sugar, but that's just another thing I'd have to hunt down from a specialty shop, and there's already too many kinds of sugar in my cupboard.

These measurements provided me with way more than I would need for a few months if I was continuously making cured meats every week, but it'll keep forever and is pretty versatile for curing fish and fowl and so on.

Dry cure mixed, I set out out two pans; one for sweet, the other for savory. For the sweet, I spread out the cure and added brown sugar and honey. For the savory, I added minced garlic, white pepper, and broken bay leaves. I dredged both bellies in the cure mix and shook off the excess. That done, I put them both in their own zip top bags and let them do their thing in the fridge for a week. The pork excretes a good amount of liquid, and this combines with the cure mix to create its brine that should remain in contact with the meat for the duration of the curing process.

Seven days later, there it was. No longer 8 lbs of pork belly, rather 6 lbs of bacon. I went ahead and prepared the sweet bacon for smoking, which involves letting the bacon sit overnight uncovered in the fridge to develop a pellicle or the slightly dried skin that will grab the smoke flavor.

On the eighth day, I got the L'il Chief smoker out and began to smoke out my apartment complex with the stank of hickory and bacon. Unfortunately, L'il Chief doesn't like to get up to temperature, so I took the sweet bacon out and brought it and the savory bacon to an internal temperature of 150°F in a 200°F oven.

First things first, I sliced the harden skin off while the adhering fat was still soft from the oven. Note the unburnt-off pig hair.

Because I refuse to allow myself to have 6 lbs of bacon at the ready, I packed up the lion's share for the deep freeze to consume or pass along at a later date. I chilled a slab of each kind of bacon for an hour for easier sliceability. There was a stark difference in color between the two. The sweet slab, obviously, being darkened from the brown sugar and light smoke while the savory slab retained a more natural color.


The savory cure surprised me in flavor. It would serve well as lardons for salads or as an addition to a sauce or pasta dish due to the strong garlic and peppery taste throughout the fat and flesh. It reminded me very much of the marinated grilled Bauchspeck that is popular at German barbeques where 1/4 - 1/2 in thick slices of pork belly are set in a garlic and/or paprika based marinade and grilled tender.


The sweet bacon, on the other hand, was more of what I expected a bacon to taste like. It had an unusually sweeter and lighter smoked flavor than your supermarket variety.


In the end, I'm glad that I doubled my chances of successful bacon by doing two different kinds, as I now have that much more bacon.

Coming soon: pickles?


07 July 2010

Dining with Paul

In order to enact some kind of vengeance on Paul, the World Cup cephalopod oracle, I went out to Oto's Japanese Market this afternoon in search of octopus. As is most usual at inland markets, I only found partially cooked octopus, so I made due with it to prepare some tako poke--cold octopus salad.

While at Oto's I perused the aisles of the store, stopping short of grabbing 90% of the packaged goods that I saw; choosing instead, to simply reading the ingredients, so I could figure out how to make them myself at a later time. One such item was the wasabi mayonaise. It has the standard ingredients for a mayo: oil, egg, and acid as an emulsifier. It was just dolled up with cider vinegar, lemon juice, mustard flour, and green food coloring. Hardly a value priced at $6.00 for 50 some odd cents in ingredients when it doesn't even contain actual wasabi.

I did cave and splurge on a $6.00, 60 g pack of tiny dried anchovies (chirimenjyako) to mix with rice and sesame seeds. Not wanting to bother slicing and soaking thin strips of wakame, I shelled out the buck fifty for a little tub of seaweed salad.

I wish I could say my lame attempt to enact vengeance upon the kraut octopus has abated, but it hasn't, so I will have to be satisfied with a tasty cold yet spicy salad on this warm Sacramento evening.

As with most of the dishes I make, I have bastardized this recipe to fit my own tastes.

Tako Poke

1 tbs - Sesame oil
1 tbs - Soy sauce
1 tbs - Lemon juice
1 tsp - Sesame seeds
1 sheet - Nori pulverized
1/2 - English cucumber halved, seeded, sliced
3 - Scallions cut on the bias
1 - Jalapeno sliced thin
4 - Tomatoes homegrown and tiny
2 - Cloves garlic minced
1/4 lb. - Octopus

Mix the liquid and dry ingredients together and toss in the produce.

Bring a pot of salted lemon water to a boil. Toss in the octopus, reduce heat, and simmer for 40 minutes or until tender. Remove, allow to cool, and dice the octopus. Add to salad and toss. Cover and refrigerate. Serve your revenge octopus cold. Wocka wocka.